Project Log: Numpet
Description#
The Numpet is a 4-button “macropad” that uses binary to replicate the featureset of a full number pad. This is accomplished by having each key combination read as a binary number, which then is converted into it’s decimal counterpart and sent to the computer as a keyboard input (e. g. Pressing the 1st and 4th button represents 1001 in binary, translating to the number 9). As 4 buttons can represent up to the number 15 in binary, numbers 1-9 output numbers 1-9, number 10 outputs 0 (this is to account for the fact that 0000 is the resting state of the device), and numbers 11-15 represent other functions such as Enter and Backspace.
Inspiration#
The inspiration for this project came from my need for a numpad at work. While shopping for one, I had the random musing that 4 keys would be all that’s necessary to be able to enter any number necessary, as well as replicate other functions of a numpad. I then related that to binary, and realized binary was an easy methodology to use for the key combinations.
The name “Numpet” is a portmanteau of “number trumpet”, as the 4 buttons reminded me of a trumpet.
Prototyping#
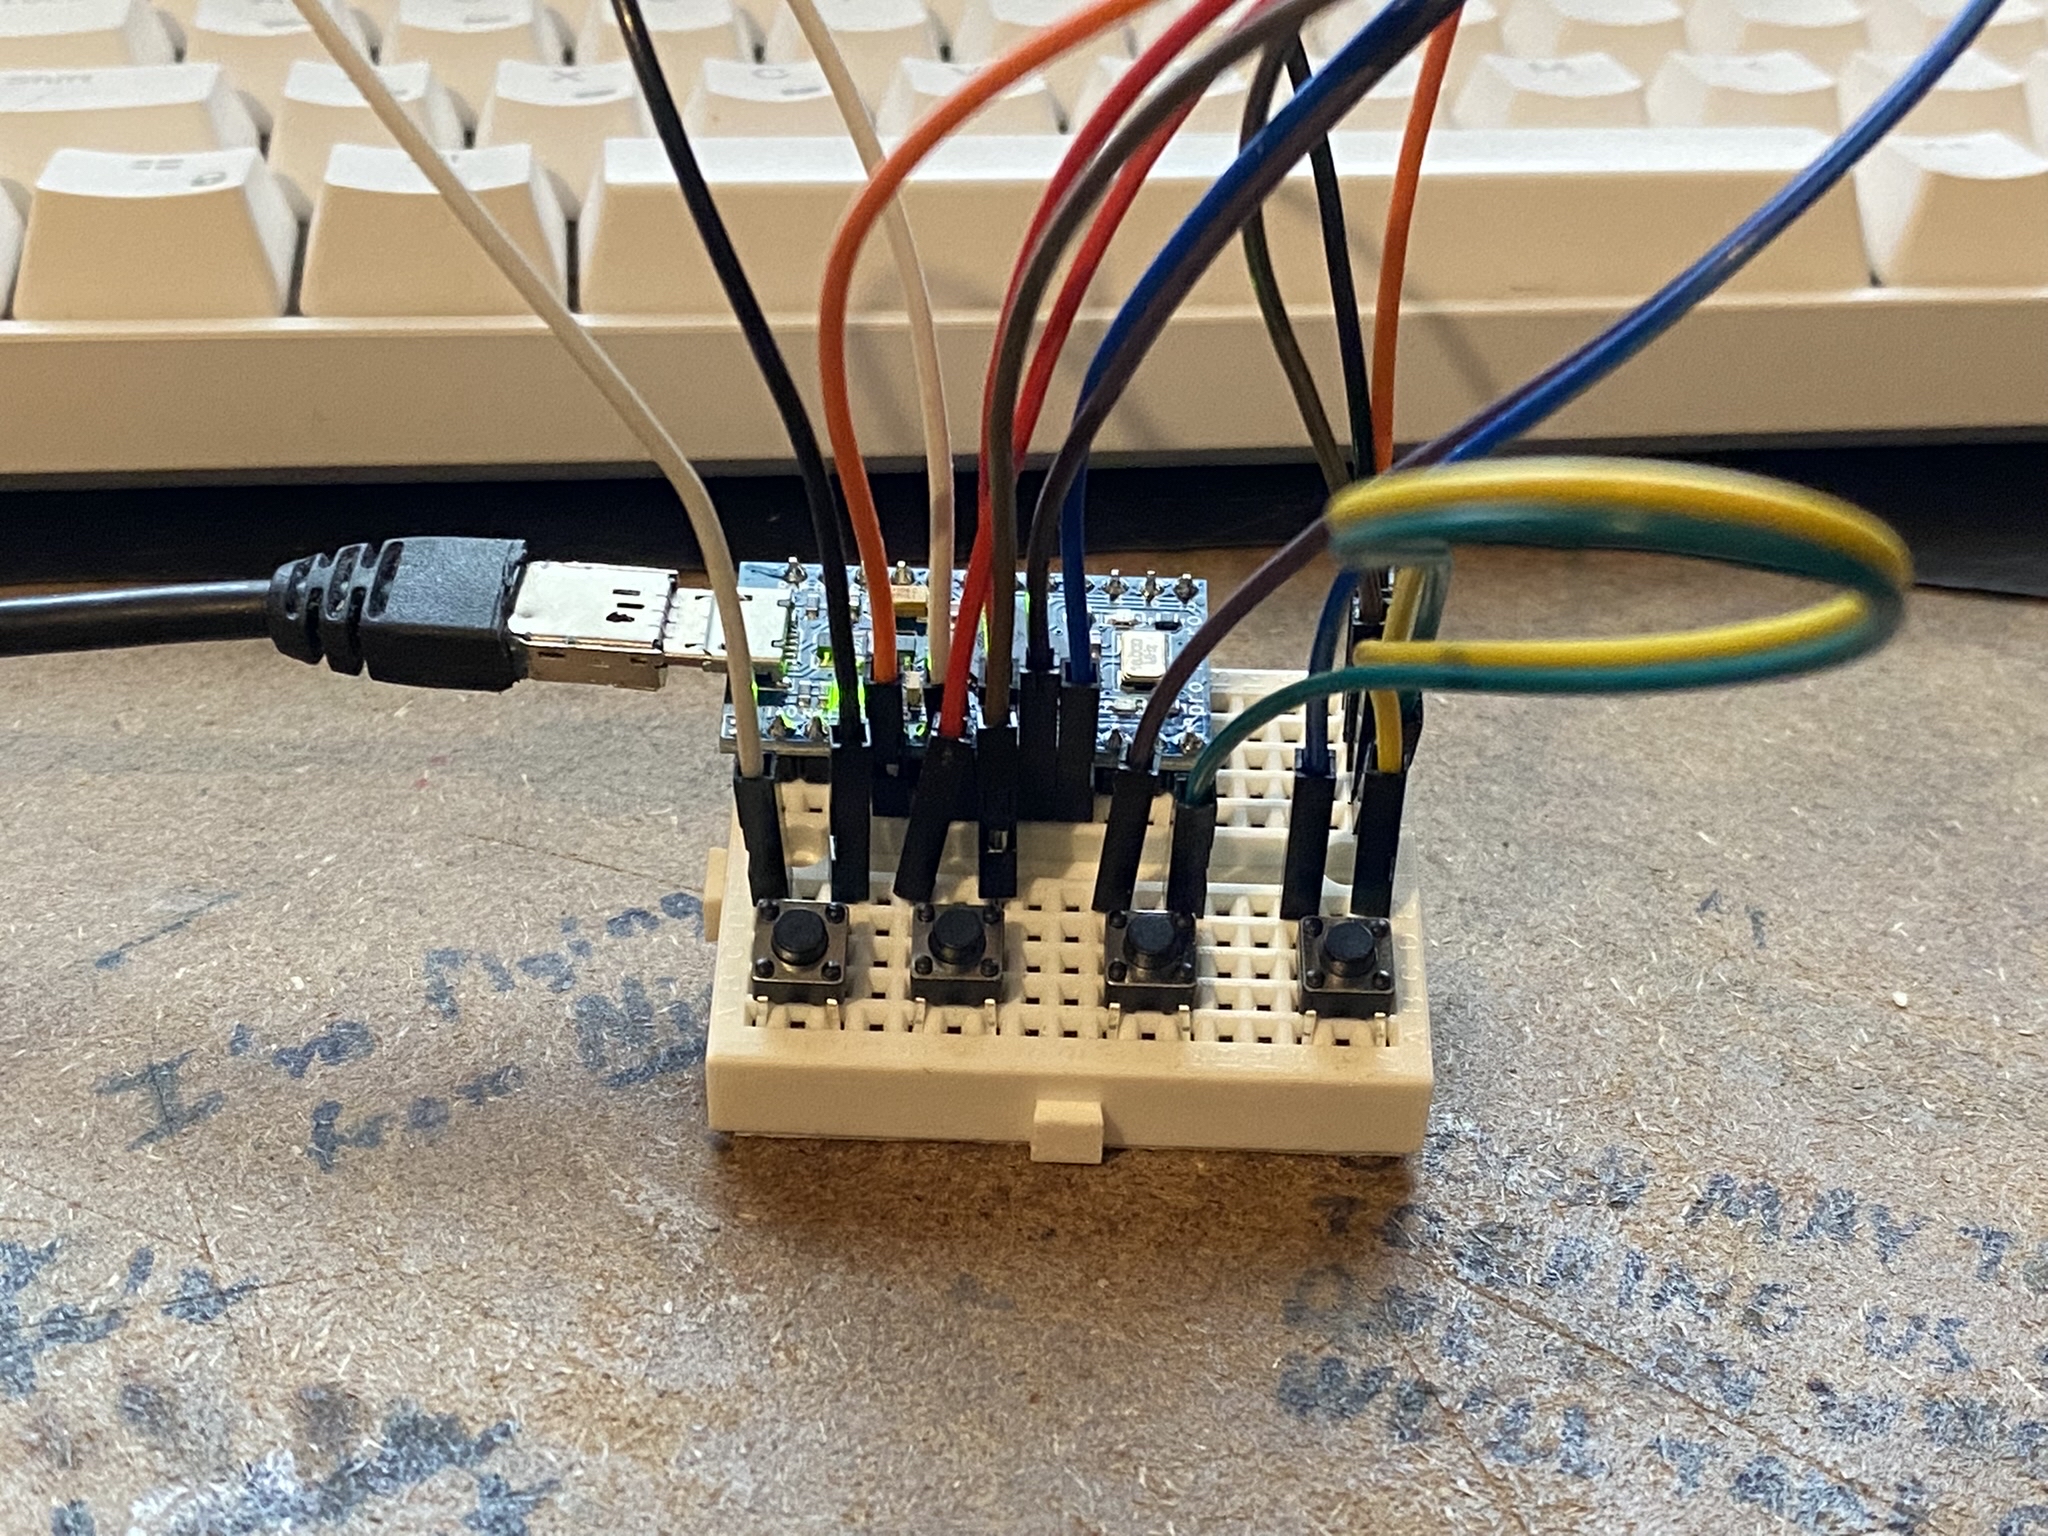
The entirety of my prototyping was done using a $14.99 Inland Pro Micro Starter Kit from Micro Center. The kit included, among other things, an Arduino Pro Micro clone, a small breadboard, and hookup wires. This was all I needed to be able to put together the initial prototype.
Build#
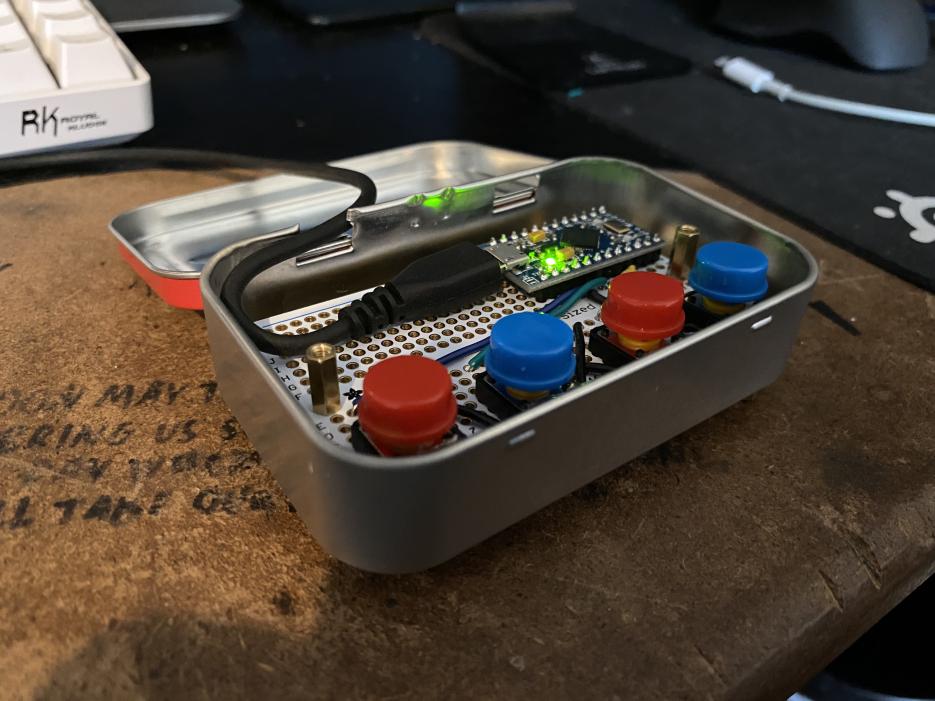
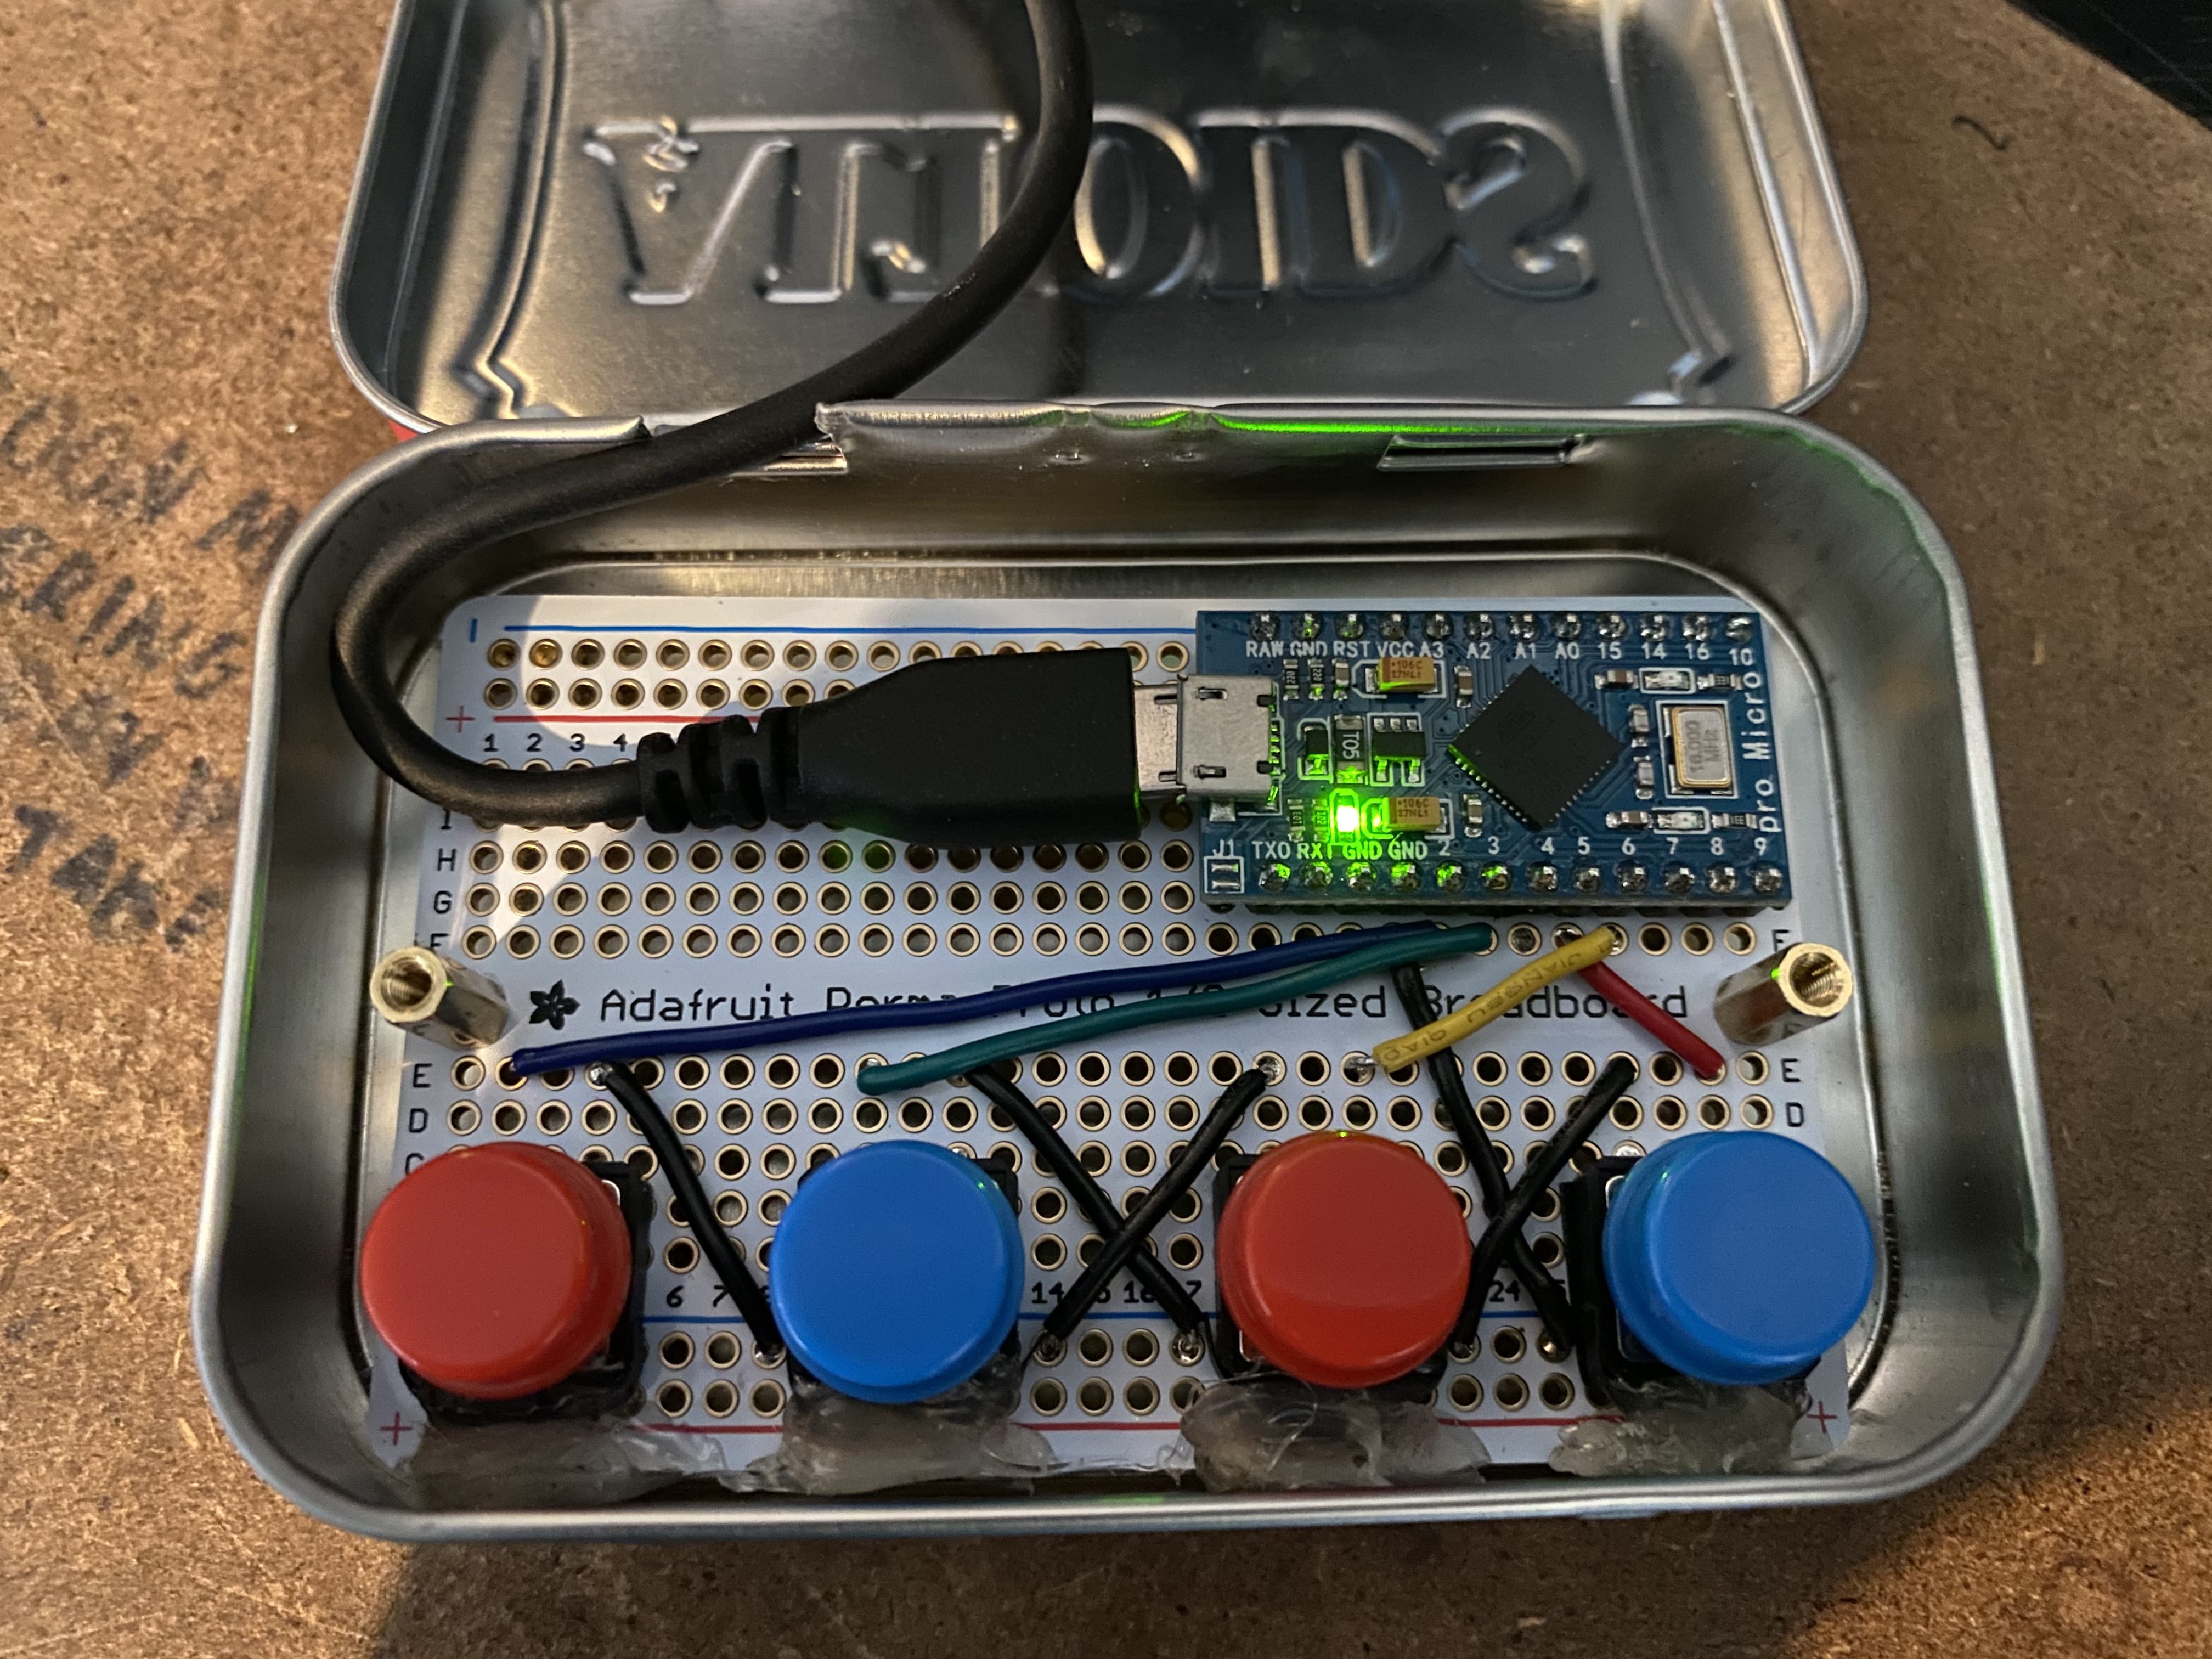
For the actual build, I decided to use an Adafruit Perma-Proto breadboard as the base board, with some tactile buttons I had picked up for a previous project, and an Altoids tin as the enclosure. Two standoffs were used to secure the board in place, with 4 more standoffs at the corners to both support the corners of the board on the inside and act as “feet” on the bottom.
Cost Breakdown#
-
~$9.99 - 1x Inland Pro Micro
-
~$4.20 - 1x Adafruit Half-Size Perma-Proto Board
-
~$1.50 - 3x Generic Tactile Buttons
-
~$1.90 - 1x Peppermint Altoids
Total Estimated Cost: $16.69 (plus change for wires and standoffs)
Assembly#
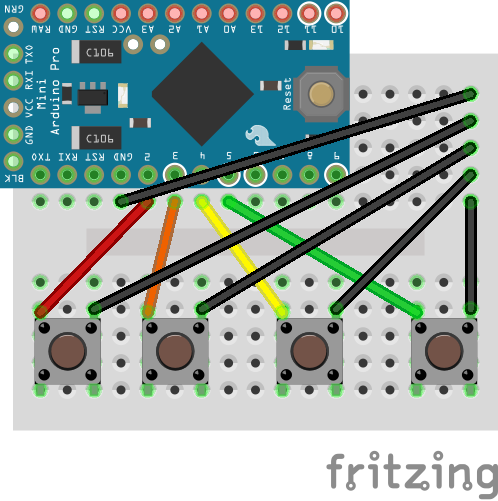
Wiring it all up was very simple. I used the internal pullup resistor, thus all I needed to do was connect one lead of each button to different pins on the Pro Micro, and then connect the other lead to the ground rail on the breadboard, which was then connected to a ground pin on the microcontroller. The breadboard ended up inhibiting by wiring however, as due to the internal connections I had to clip the bottom pins of the buttons (hence the hot glue at the bottom of each button). In addition, it forced me to orient the microcontroller horizontally, when I would have preferred to orient it so that the microUSB port faces out the back.
Images#
Code#
#include "Keyboard.h" // Includes the Keyboard library so we can emulate a keyboard

// Sets the pins corresponding to each button
const int BUTTON1 = 5;
const int BUTTON2 = 6;
const int BUTTON4 = 3;
const int BUTTON8 = 2;

// Sets the initial state of all buttons to 0
int BUTTON1State = 0;
int BUTTON2State = 0;
int BUTTON4State = 0;
int BUTTON8State = 0;

// Sets parameters for debounce, with a delay of 50 milliseconds
unsigned long lastDebounceTime = 0;
unsigned long debounceDelay = 50;

void setup() {
  // Sets the button pins as inputs using the internal pullup resistor
  pinMode(BUTTON1, INPUT_PULLUP);
  pinMode(BUTTON2, INPUT_PULLUP);
  pinMode(BUTTON4, INPUT_PULLUP);
  pinMode(BUTTON8, INPUT_PULLUP);

  // Starts keyboard emulation
  Keyboard.begin();
}


void loop(){
  // Reads the state of each button
  BUTTON8State = digitalRead(BUTTON8);
  BUTTON4State = digitalRead(BUTTON4);
  BUTTON2State = digitalRead(BUTTON2);
  BUTTON1State = digitalRead(BUTTON1);

  // Sets time of first input
  if (BUTTON8State + BUTTON4State + BUTTON2State + BUTTON1State < 4) {
    lastDebounceTime = millis();
  }

  // Only runs code if buttons continue to be pressed for 50 milliseconds
  if((millis() - lastDebounceTime) > debounceDelay) {
    if (BUTTON8State + BUTTON4State + BUTTON2State + BUTTON1State < 4) {
    // Reads input, recognizing any switch pressed between two rest states
    int ones = 0;
    int twos = 0;
    int fours = 0;
    int eights = 0;
    while(BUTTON8State + BUTTON4State + BUTTON2State + BUTTON1State < 4) {
        BUTTON8State = digitalRead(BUTTON8);
        BUTTON4State = digitalRead(BUTTON4);
        BUTTON2State = digitalRead(BUTTON2);
        BUTTON1State = digitalRead(BUTTON1);
        if(BUTTON8State < 1) {
          eights = 1;
        }
        if(BUTTON4State < 1) {
          fours = 1;
        }
        if(BUTTON2State < 1) {
          twos = 1;
        }
        if(BUTTON1State < 1) {
          ones = 1;
        }
      }
      // Uses binary to determine what number was intended
      int num = (eights * 8) + (fours * 4) + (twos * 2) + ones;
      if(num <= 9) {
        Keyboard.print(num);
      } else if(num == 10) {
        Keyboard.print(0);
      } else if(num == 11) {
        Keyboard.print("boop"); //placeholder
      } else if(num == 12) {
        Keyboard.write(KEY_BACKSPACE);
      } else if(num == 13) {
        Keyboard.print("boop"); //placeholder
      } else if(num == 14) {
        Keyboard.print("boop"); //placeholder
      } else if(num == 15) {
        Keyboard.write(KEY_RETURN);
      }
      delay(20);
    }
  }
}
The code is relatively simple, reading button input and translating it into a number using binary syntax. In order to account for the fact that the tactile buttons make pressing key combinations difficult, the code is written so that after a button is triggered, any inputs read until all buttons are released are recognized. Therefore, this input sequence would produce 96 (1 represents a pressed button):
0000
1000
1001
0000
0110
0010
0000
This allows the board to be more forgiving when it comes to key presses, but means that holding down a button combination will not repeat the key input, a feature seen on regular keyboards. While unnecessary for this project’s purpose, it could be accommodated in future revisions of the code.
Final Thoughts#
While this ended up being a great first project, and I learned a lot about the basics of working with an Arduino/Arduino-Compatible microcontroller, there were a number of changes I would make if I were able to redo this project:
-
I would have gone with a perfboard instead of a breadboard, as the built-in traces ended up limiting my options for board layout.
-
I would have used a smaller and cheaper microcontroller as the Pro Micro was overkill for this project. I planned to use a Trinket for the final project, however I accidentally picked up the Trinket 3v instead of the M0, and the 3v was not suitable for the project.
-
I would have went with different buttons. The tactile buttons ended up requiring a lot of force to actuate, and thus are somewhat inefficient for the “typing” style the Numpet requires. I would potentially like to reimplement this later using a NeoKey 1x4 with 4 key switches for a better typing experience. Mouse switches may also be an interesting way to implement a lower profile version.
Overall this was an extremely valuable learning experience, and I regard it as a success.